山姆的編程實作分享。。。

Sam Blog, Sam Sharing, Sam Studio

顯示具有 Linux 標籤的文章。 顯示所有文章

2020年12月1日

[Building Embedded Linux] Part 3: Target Board


 “Building Embedded Linux” 總是要有 "Target Board" 吧!

若你已經有 Target Board 了,那這篇文章,你就不用再繼續閱讀了;若你還在挑選 Target Board ,那底下的 2 點可以參考一下。

  1. 普遍性:這一點有兩項好處,第一項好處就是板子的取得價格 "低",不會太傷荷包;第二項好處是 "社群支援多";例如 Arduino 以及 Raspberry Pi 的板子,使用的人多,想問問題,到相關的社群都可以得到幫助。

  2. 成功的案例:以一人之力而言,Building Embedded Linux”也算是一項 "大工程",個人建議先找到成功的案例,然後模仿案例走一趟過成功的路徑,接著在改變 Target Board,再走一遍;這樣的模式,雖是 Build 了兩回 Image ,但成功率絕對會是很高的,不會讓你灰心喪志。

個人手邊有 Raspberry Pi 3 Model B+ 以及 10年前買的 S3C2440A,依照上面兩點,所以我會先以 Raspberry Pi 3 為 Target Board ,再 Port S3C2440A。 


2020年11月30日

[Building Embedded Linux] Part 2: Buildroot vs. Yocto


Building Embedded Linux 的做法,在業界有 Buildroot 和 Yocto,兩種做法;兩者的差異,也有人做了一番比較,原文為底下連接。

Buildroot vs Yocto


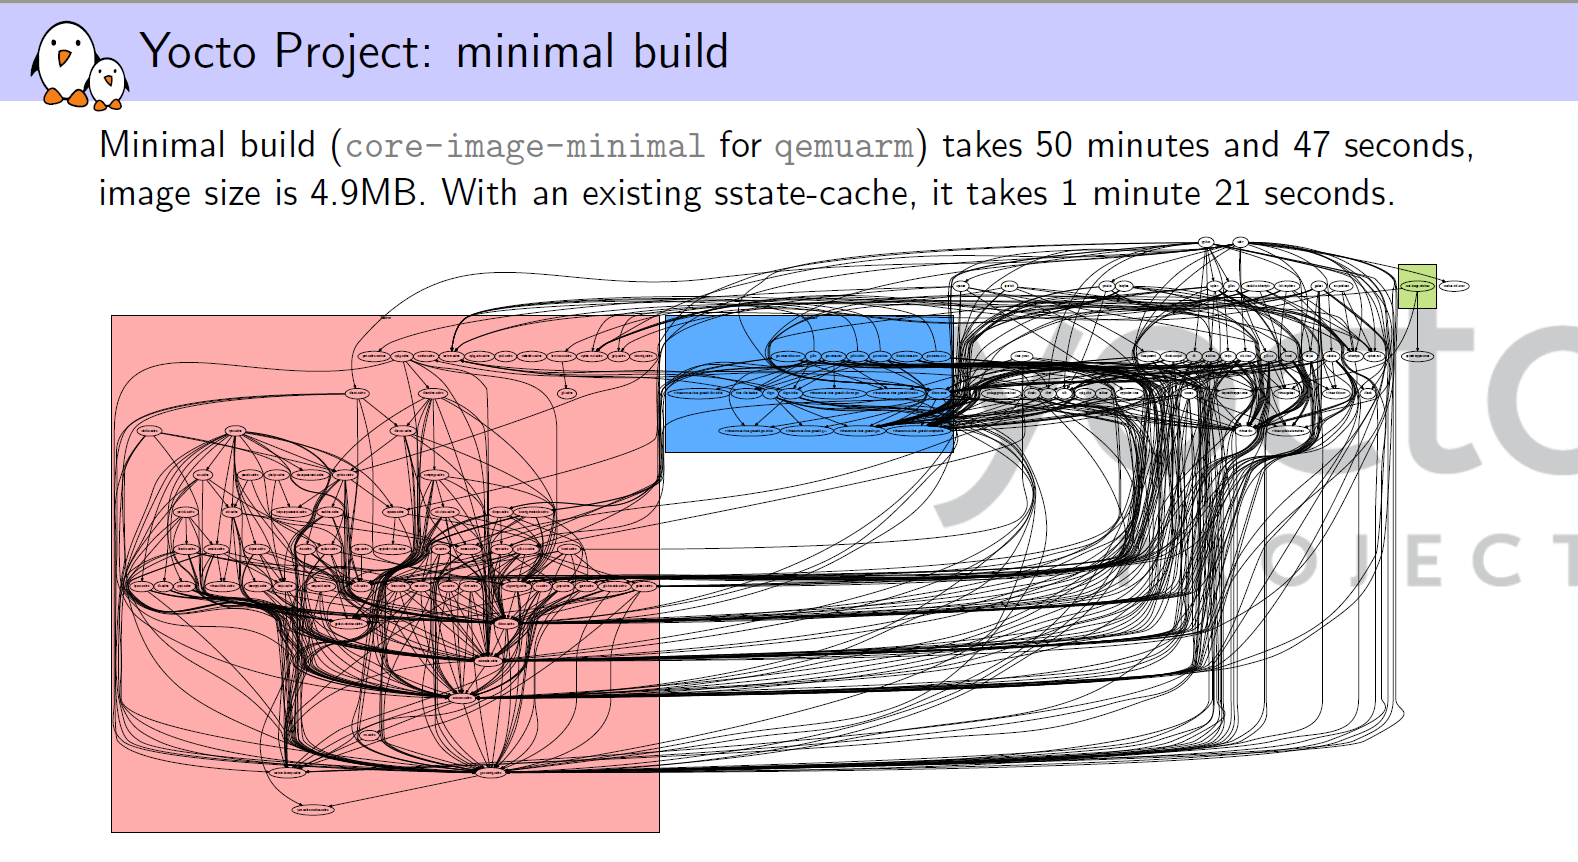
對於 Linux 不是很熟悉的人, 建議可以直接看 Page 28, 29 以及 31。

Page 28: Buildroot minimal build takes 15+ minutes, Image size is 2.2MB

Page 29: Yocto minimal build takes 50+ minutes, Image size is 4.9MB

相信從這兩張 Slides, 就可以清楚明白這兩種做法的差異度了,這兩種做法沒有好壞之分,只有取捨問題而已。

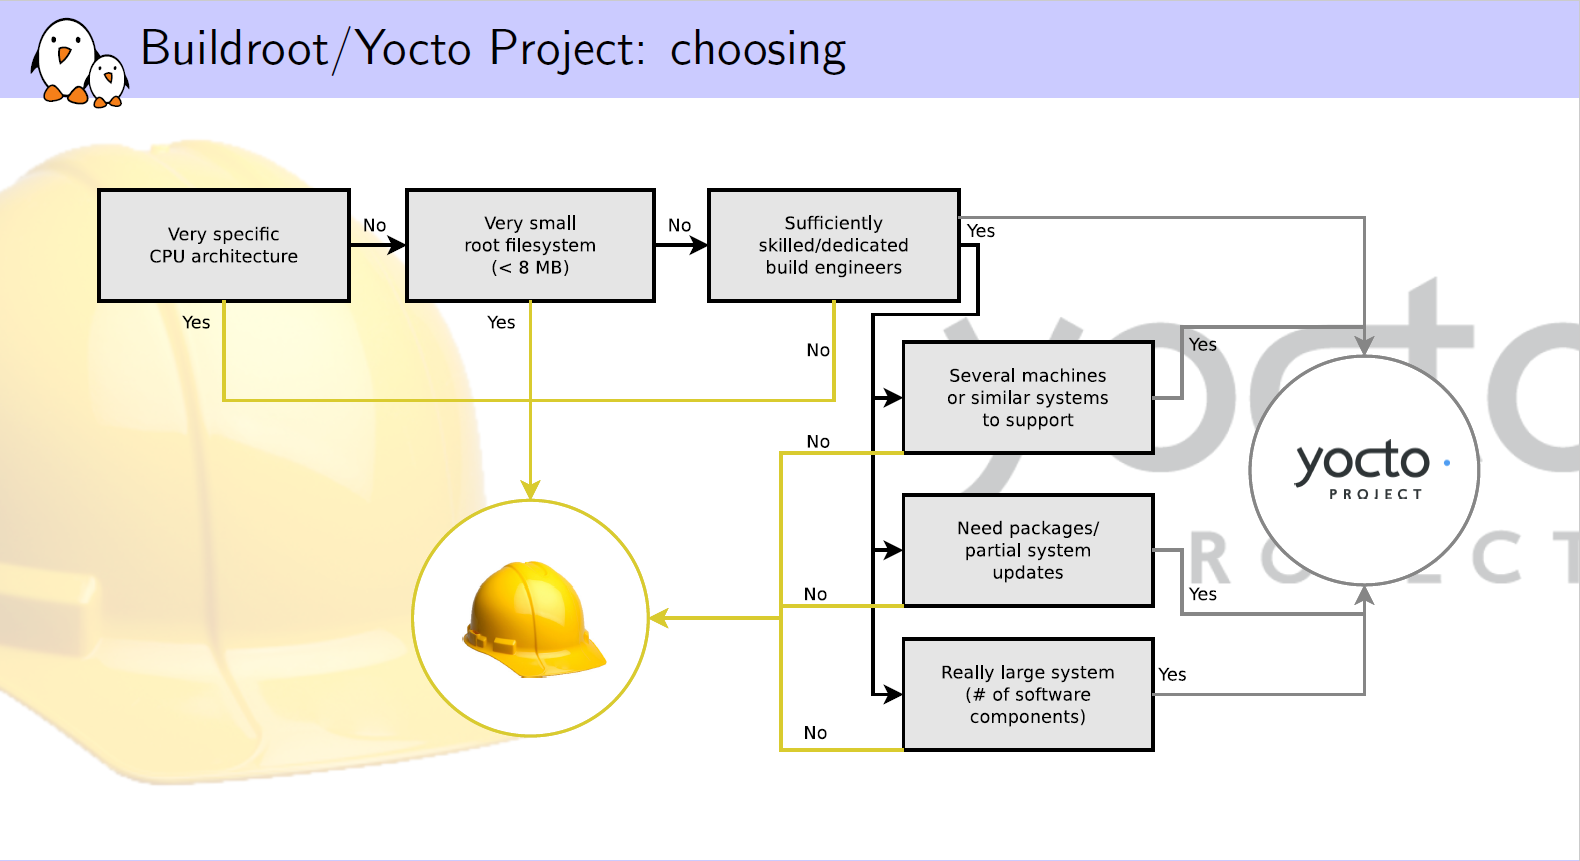
那如何取捨呢?

原文的 Page 31 就提供了選擇的路徑


而我的選擇是 - Buildroot。

原因如下:

選擇 Buildroot ,除了他強調的 "簡單 ( Strong focus on simplicity )" 以及 “小巧 (small by default)”之外,我另一個在意點,是他保留了原有的 build tools ,如 kconfig, make ...,對於曾經嘗試 Building Embedded Linux 的我,熟悉度以及經驗的承續,都有加分的效果。

而不選擇 Yocto 的原因,是我曾經失敗過,知道 Building Embedded Linux 的 困難度,所以我目前的要求,不是細緻度。


2020年11月29日

[Building Embedded Linux] Part 1: 重拾 Embedded Linux


Building Embedded Linux 一直是作為工程師的我,想完成的一件事 (夢想),

那時掏寶在台灣還不盛行,所以上圖這塊板子 (S3C2440A) ,著實花了我好幾張小朋友;

自己搞了半年,雖是沒有具體的成果,但也從失敗中瞭解了更多 Embedded Linux 的知識;

而身處手機代工業的我,在 Google 推出了以 Linux 為核心的 Android 手機後,

我也就從在 "RTOS 打混" 輾轉換成在 "Embedded Linux 摸魚”了;

你說這是巧合,還是孽緣?


在 Linux 推出 20 年之際,偶然的機會又讓我看到 Buildroot 文章,

發現 Building Embedded Linux 不再是那麼瑣碎,已經可以有系統性的被建構了,

這著實又燃起了我的 "工程師魂" 了! 

我的 S3C2440A 是否可以重見天日 ?

還是孽緣作祟? 

待續。。。


2020年10月16日

[Ubuntu] Open VSCode & Sublime-Text Editors from Terminal


 For Visual Studio Code

Just use command code to open Visual Studio Code from Terminal

         For example: code path/of/file 


For Sublime Text editor 

Just use command subl to open Sublime Text editor  from Terminal

         For example: subl path/of/file 


2020年9月27日

[WSL] 實測 WSL Mount Command


  [WSL] 實測 WSL Mount Command


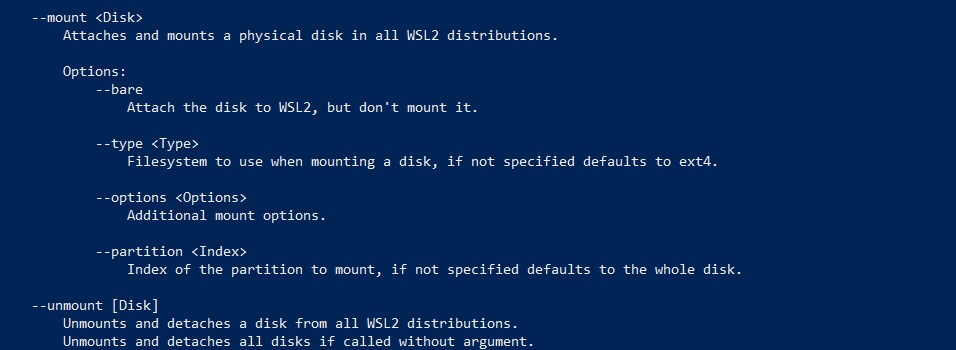
透過不斷的升級,花費一上午的時間,迎來的 Mount Command,當然要實測一下喽!


首先是透過 wmic command 取得硬碟路徑


接著按照說明文件,省略 --partition 的指派 (說明文件說可以省略),卻得到錯誤的訊息。


這是加上 --partition 的指派

EXT4 partition 就真的掛接上 Linux Subsystem 了 :-)


在 Linux Subsystem ,可以看到 EXT4 硬碟是被掛接在 //mnt/wsl 目錄下


接著,在掛接的 EXT4 硬碟上建立目錄,開檔案,也一切正常!

 接下來就等 Mount Command 正式的 Release 了!


[WSL] WSL Mount Command


 [WSL] WSL Mount Command


之前在研發大型專案, 如 Android 系統,都是在 Ubuntu OS Terminal 的環境下做開發,

但是平時常用的 Apps,卻又是在 Windows 系統下 ,如 Office, Outlook...;在只有一台

電腦的情況下,一般的解法不外乎就是 1) 裝 VM 或是 2) 安裝 Windows Ubuntu 雙系統,

不停地切換,工作效率真的很差!


知道有 WSL ( Windows Subsystem for Linux ) 後,就迫不及待的安裝來使用,使用後的

心得是 "很棒"!真的可以解決 1) VM 拖慢系統速度以及 2) 雙系統不停切換的問題了。


但是有一點就是它 ( Linux System ) 只能安裝在開機硬碟,佔用了 SSD 的空間;

Linux Subsystem 安裝在 SSD 是可以被接受的,但是 Development Code 佔用開機硬碟的

空間就真的無法接受了。


所幸,Windows 的開發人員也看到了這個問題,在 Window 10 Insider Preview 20221 build

就帶來了好消息!User 可以掛接 ext4 的硬碟供 Linux Subsystem 使用。


但因為是 Preview 版本,只有加入Windows 測試人員計畫才能正規取得。


畢竟是 Preview 的版本,還未通過穩定以及安全性的測試,所以我採用的方法是 “Dual Boot”,也就是不直接升級平時用的 Windows,而是將 Preview 的版本安裝在另一顆硬碟 ( PS : 試用 Preview 版本後的心得是 : 還好我有這樣做 😁😁😁 ,因為 "Dual Boot” 還一度失效,我平時用的 Windows 差點回不來 )。


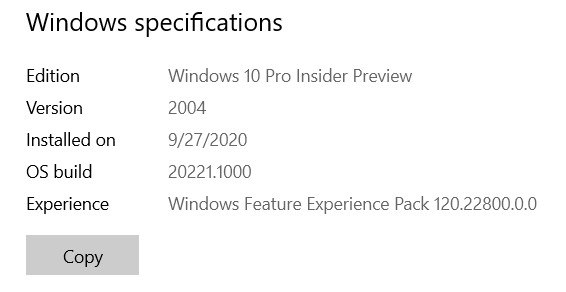
這是 Window 10 Insider Preview 20221 build 安裝完成的畫面


透過不斷的升級,最終迎來我要的 WSL "Mount" Command, 20221 build 才有的喔! 


2020年9月24日

[Error] /usr/bin/env ‘python’ no such file or directory


For this error, please try below 3 possible solutions


# Possible Solution 1

You may not install Python yet, please follow below command to install it

sudo apt install python3.7


# Possible Solution 2

You have installed Python3, but "python" command is not equal to "python3" 

Please follow below command to let them equal (Ubuntu 20.04)

sudo apt install python-is-python3


# Possible Solution 3

Symptom is same as  "Possible Solution 2", but OS is Ubuntu 16.04.

Please follow below commands to create a symlink

whereis python3

run above command to get Python and Python3 installed directory\ies

sudo ln -s /usr/bin/python3 /usr/bin/python

run above command to create a symlink, the /usr/bin/python3 and /usr/bin/python are examples, please instead by the result of "whereis python3" command


2019年5月10日

Shipping a Linux Kernel with Windows


前不久我才自己打開Windows 10 在 build 14393 後新釋放的一個新功能 - WSL (Windows Subsystem for Linux), 然後嘗試這個新功能, 並且發文 (It's time to use Linux / Ubuntu by using Windows Subsystem) 鼓勵大家使用; 而這個新功能打開後, 使用者還必須自己去安裝 Linux kernel, 但在 May 6th這個時間點, Microsoft devblog 釋出以下的訊息

訊息連結 : Shipping a Linux Kernel with Windows
也就說, 再不久, Windows 10 就 build-in Linux Kernel, 我們真的可以擺脫 VM 或雙系統了😃

事實上, 從 Stack overflow 的9萬份的市調, 可以看到 Linux 已經是developer 心中開發平台的首選了, 姑且不論Microsoft 此舉是力挽狂瀾 ? 或順應潮流 ? 但這做法是我們期待的, 畢竟 Windows 是我們熟悉的, 日常的工作也都是在Windows 環境下.

Linux and Windows are the most common platforms

2019年4月12日

It's time to use Linux / Ubuntu by using Windows Subsystem


The Windows 10 build 14393 or later version is ready to Linux installation by using the Windows Subsystem.

By this way you don't need to setup a virtual machine or reboot into Linux by using a dual-boot PC.

The detail installation guide for Linux on Windows system, please follow below two links

https://www.makeuseof.com/tag/linux-beginners-guide/

https://www.makeuseof.com/tag/linux-desktop-windows-subsystem/


2018年12月10日

Error opening serial port - Permission denied


The temp solution is

In terminal to execute below command

sudo chmod 666 ttyACM0

after power on-off cycle, this problem still exists
PS: the 666 means r+w

The final solution is done by adding the currently logged user into dialout group with the following command:
sudo usermod -a -G dial $USER


2017年9月5日

遠端桌面連線 Ubuntu to Ubuntu by VNC


Step1 : Server side, install tightvncserver by running below command
$ sudo apt-get install tightvncserver

Step2 : setup a password for remote access by running below command
$ vncserver

Step3 : Normally , the Ubuntu already has installed "remote desktop viewer"
if not, please go to Ubuntu Software Center to install it first
if yes, please
a.) execute remote desktop viewer
b.) press "Connect" -> select "VNC" protocol -> then press "Find" to select what server you want to connect to

2014年6月21日

遠端桌面連線 Mac to Ubuntu by VNC ( Remote Desktop Control Mac to Ubuntu )


Ubuntu Side

Step1: Enable desktop sharing at Ubuntu side and setup the password for Desktop sharing connection


Step2: Check Ubuntu IP address, in my test, my IP address of IBM NB is 10.0.1.28


Step3: Ubuntu side is done


iMac Side

Step1: install VNC Viewer for Google Chrome from Chrome store


Step2: after installed, open it then

  1. input IP address of Ubuntu side
  2. input password that you set at Ubuntu step1 


Step3: if everything is correct, you will see the Ubuntu desktop in your iMac  :-)


2014年5月5日

移植 Linux - Samsung S3C2440A CPU


6 years ago, I bought a board with S3C2440A inside for WinCE 5.0 development;
Try to port Linux OS on it.

Hardware Spec:

  • Samsung S3C2440A, 400MHz
  • 2M bytes NOR Flash
  • 64M bytes NAND Flash
  • 64M bytes SDRAM
  • 100Mbps Ethernet port x1
  • USB 1.1 x 2 ( one is HOST port, another is Device port )
  • COM port x 2
  • 3.5" TFT LCD (240x320) with 4 lines touch panel 

熱門文章